Glitching Sound: how to data bend with imagemagick

Inspired by Antonio Roberts’s excellent tutorial on how to databend with Audacity, and following on from my previous tutorial on how to data bend audio, this post explores how to glitch audio using image software. Many of the required tools use the command line. This will work with linux, unix and mac. If you want to use windows, you will need to edit the autobmp.sh bash script so that it does not use the /tmp directory.

You will need

  • The autobmp.sh script
  • Imagemagick (You probably already have this if you use linux.)
  • BASH (you already have this if you use linux or if you have a terminal on your mac)
  • A utility to convert between audio formats that supports the .au format. I use sox, which is cross-platform and available via apt-get.
  • Audacity

Why these formats?

.au and .bmp are both uncompressed formats, so every sample of audio becomes the R, G or B value of a pixel. AIFF and WAV files are also uncompressed, but the files have more structure to them that is not sound data, so .au seems easier.

Getting Started

10 seconds of a sawtooth wave

Using sox to convert between uncompressed audio formats is really easy. To convert a file called foo.wav to an au file, you would just type: sox foo.wav foo.au  It looks at the extension and does the right thing.
Put the script in a directory in your path, OR just put it in your current working directory.
Once you’ve got foo.au, to convert it to a bmp, you’d type: ./autobmp.sh foo.au foo.bmp  This will give you a file called foo.bmp, which is the bmp image of your audio.
Let’s say, you’ve done a bunch of transformations and now have a file called bar.bmp. To turn that back into audio, you would type: convert -depth 16 bar.bmp rgb:bar.pcm  It is now back in an audio format, but the header has gotten slightly tweaked, so we’re not done. Open Audacity, and under the File mean, select, ‘import’ and then ‘raw audio’. Pick bar.pcm in the file chooser. On the popup window, tell it that the file is ’16-bit linear’ and ‘little endian’. There will be a few samples of crap at the beginning of the imported audio. That’s what’s left of your old .au header. you can delete it if you want. there will also be a bit of silence at the end of the file. This was padding added to make the image rectangular. To convert this into AIFF or WAV or MP3 or whatever, select ‘Export’ from the file menu.
If you have ended up with a different image format, such as jpeg or whatever, you don’t need to first convert back to bmp. To get from baz.jpeg back to audio, use convert directly and carry on as above. convert -depth 16 baz.jpeg rgb:baz.pcm

What to do while it’s a graphics file?

This is the creative bit! Converting to a lossy graphics format, such as jpeg adds some noise, so that might be fun. If you do that, you can glitch the jpeg by opening it in a text editor and doing a bit of typing at various points in the file. This causes weird visual distortions, which will become audio distortions when you convert back.
You can also try opening the graphics file in a graphics program. Some of the graphics effects may make interesting sound changes, although many won’t. Experimentation is needed. You can also try drawing on the image. Wide lines of a solid colour will create weird DC offsets, so if you want to avoid that, consider either using very thin lines or else setting an opacity of under 100%.
Have fun!

Music commissions make great gifts. Order now for this holiday season!
How To Data Bend

I got email asking me how to do data bending for audio. (If you want to know how to do it with images, check out Hello Catfood’s posts.) Databending means taking one kind of data and using it as another kind of data. For example, playing an image file as a sound. Or processing an audio file with an image program and then returning it to it’s audio format. This post will focus on how to open non-audio files as if they were audio.
There are two different programs I’ve used for databending. One is Sound Hack, which is free, but mac-only and the other is Audacity, which is also free and cross-platform. For mac users, I suggest running 1.2.6 instead of the beta version.

Data Files

Opening data files with either Sound Hack or Audacity is easy. A data file is a file used by an application, for example a text file created by Word or Open Office or an image file or anything you might find in your Documents folder. With Sound Hack, under the File menu, select “Open Any” and pick a file. The go to the Hack menu and select “Header Change.” You can try a few different headers and listen to them until you pick one that you like. Once you’ve found a good one, go to the File menu and select “Save a Copy.” That will open a new dialog. At the top is the file name. Add a “.aiff” (without the quotes) to the end of the file name, no matter what you decide to name it. At the bottom, make sure to set the Format to “Audio IFF” and the Encoding to “16 bit linear.” I’ve found that Sound Hack does not save reliably into other formats.
To open a data file with Audacity, under the Project menu, select “Import Raw Data.” Pick the file you want to open. A dialog will pop up asking what header you want. I usually go with the default values, but you can try playing around with that. You can then modify the file with Audacity, using the Effects or whatever. When you think you’re done, first go to Preferences and then go to the File Format tab. Make sure that the format you want (Aiff, WAV, etc) is selected. Then, go to the File menu and “Export As” that file type.

Applications

You can also open applications as audio, but this is a bit weird on the mac. Go to the finder and find the application you want to open. Control-click on it. (by holding down the control key as you click). In the menu that pops up, select, “Show Package Contents” A new window should open with a folder in it called Contents. Open that folder, and you should find some stuff in it including a subfolder called MacOS. In that folder, you’ll find, probably, a file with the same name as the program. Like in Garage Band, under Contents/MacOS/ there’s a file called GarageBand and two other files, all of which may be interesting. Control-click on the file and select “Open With”. Then select “Other . . .”. A new dialog will open. In the Bottom part of the window, change the menu from “Recommended Applications” to “All Applications”. (Do NOT check the box under that!) Then find Audacity or Sound Hack, select it and click the Open button. If you use Sound Hack, you can try out different headers, by doing a Header Change under the Hack menu. Save these files is the same as described above.

Examples

I haven’t used this technique for years, but if you’re searching for examples of how it sounds, I’ve got some pieces. My supervisor, Scott Wilson, also uses this on his CD Muellmusik, in the track Photo Shopped Music. Other examples abound. You’ll find that if you do this a bit, you’ll not only be able to recognize other people doing it, but also sometimes be able to recognize what kind of file they’re using. Stochastic Synthesis also sounds quite a lot like data bending.

Audio software on 10.5 / Intel

Audacity

I’ve been starting to try to record things on my new mac, despite feeling cruddy with a bad cold. I first started out with trying to use the beta version of Audacity. It acted much more like an alpha version. After the 4th crash in which all my data was lost, I took a look back at the non-beta version of Audacity. This seems to be stable and work well. However, it just doesn’t have enough features to use it for composing. It’s great for recording a vocal-only podcast or running FX on pre-existing audio, but it’s not going to cut it for my needs now. So I turned to Ardour.

Ardour

Ardour does just about everything I need. It’s a competitor to Protools and Digital Performer. And it’s free!! W00t. In the past, I only ever used this on my macmini because I had a disk space shortage on my old laptop. I was less worried about the program itself and more concerned about having space for y projects. Audio files can take up a lot of space.
It has some system requirements. If you’re on 10.4, you will need to install x-windows, if you don’t already have it, which means you need to go dig out your system disk. If you’re on 10.5, you will have other issues. It requires a helper application called Jack.

Jack

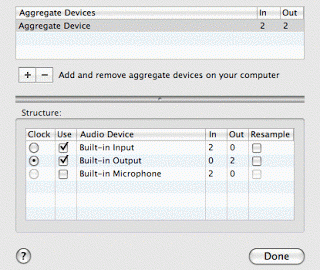
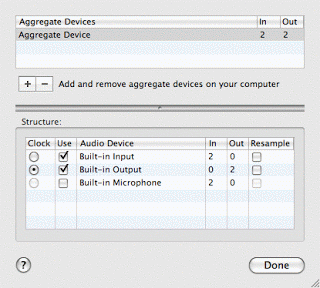
Jack is awesome. If you’re on intel, once you install it, you will need to open /Applications/Utilities/Audio MIDI Setup. Under the Audio menu, open the Aggregate Device Editor.
Aggregate Device Editor

At the top part, you can create aggregate devices and give them names. In the bottom part, you can see the actual audio devices on your computer, with check boxes next to them. Check the ones that you want to use.
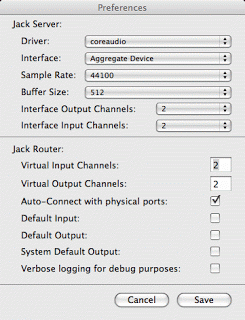
Then, you need to configure jack. Fire up JackPilot. You need to tell the preferences to use your aggregate device.

JackPilot Preferences

Patching the X version

10.4 is now ready to go, but 10.5 has some changes in how X windows is handled. You have two options on running Ardour. One is to run a patch. The development team has already figured out how to solve this problem, but they’re short staffed or something and haven’t updated the version or download. Ergo, you need to apply some small changes to the program by typing a few things at the prompt. This is easy enough, but if you don’t like prompts, skip to the alternate solution.
The terminal application is located at /Applications/Utilities/Terminal. Open it up. Between you and me, the terminal is awesome. It gives you all kinds of power over your computer. In a future post, I’ll link to a cool manual, but I can’t find it right now, alas. Anyway. Here’s what you do:

  1. Select the following text and copy it (by going to Copy under the Edit Menu or typing apple-C)
    Index: script
    ===================================================================
    --- script      (revision 2354)
    +++ script      (working copy)
    @@ -32,17 +32,22 @@
         sed 's/xterm/# xterm/' /usr/X11R6/lib/X11/xinit/xinitrc >> ~/.xinitrc
     fi
     
    -mkdir -p $TMP
    -cp -f "$CWD/bin/getdisplay.sh" $TMP
    -rm -f $TMP/display
    -open-x11 $TMP/getdisplay.sh || 
    -open -a XDarwin $TMP/getdisplay.sh || 
    -echo ":0" > $TMP/display
    +if uname -r | grep -sq '^9' ; then
    +    # leopard will auto-start X11 for us
    +    :
    +else 
    +    mkdir -p $TMP
    +    cp -f "$CWD/bin/getdisplay.sh" $TMP
    +    rm -f $TMP/display
    +    open-x11 $TMP/getdisplay.sh || 
    +       open -a XDarwin $TMP/getdisplay.sh || 
    +       echo ":0" > $TMP/display
     
    -while [ "$?" == "0" -a ! -f $TMP/display ]; do sleep 1; done
    -export "DISPLAY=`cat $TMP/display`"
    +    while [ "$?" == "0" -a ! -f $TMP/display ]; do sleep 1; done
    +    export "DISPLAY=`cat $TMP/display`"
     
    -ps -wx -ocommand | grep -e '[X]11' > /dev/null || exit 11
    +    ps -wx -ocommand | grep -e '[X]11' > /dev/null || exit 11
    +fi
     
     cd ~/
     shift
    
    
  2. Ok, now be relaxed. If you don’t want to know more about what that code is doing, you don’t have to. Go to your terminal and in the window there, type:
    cd; cat > ardpatch
  3. Now, still in your terminal window, paste in all the code from the clip board, by selecting paste in the edit menu or typing apple-v
  4. Still in the terminal window, type ctrl-d. What you did just then was change to your home directory (with “cd”) and then put the code into a file called “ardpatch” (with the cat > ardpatch). And then closed that file by typing ctrl-d.
  5. Ok, now you need to know the directory where you put Ardour. If you put it in /Applications, then you’re going to type:
    cd /Applications/Ardour2.app/Contents/Resources/

    but if you put it in a folder in /Applications called Audio, then what you’ll need to type is:

    cd /Applications/Audio/Ardour2.app/Contents/Resources/

    cd is changing directory and you need it to change to a hidden directory inside Ardour, so the first part is the location where you stuck the program.

  6. Then type:
    patch -p0 < ~/ardpatch

    It will tell you strange things and possibly give you an error. Ignore all that. Instead, start jack with JackPilot and then click on the Ardour2 icon to start the program. It should start up, but for me, this took several minutes, I think just because it was the first time.

You only have to apply the patch once, so you're good to go from now on. Or you can try a riskier but easier route.

Native Version

Beta software is always fun, isn't it? You can try running the native version instead. It's beta. It could crash terribly. I haven't tested it much, so I can't recommend it or warn you away or do anythng else aside from tell you it's semi-secret location.
Well, it's more an open secret. I got it from the IRC channel on freenode. If you need help, that's a good place to go, by the way. (Is IRC undergoing a renaissance or is it just me?)
The native version is at http://ardour.org/files/releases/Ardour2.2-Intel-2920.zip
It's probably a secret for a reason. I'll give it a try this afternoon and let y'all know what I think.
The native version still requires Jack. You will still need to do all the Jack configuration listed near the top.

Conclusion

The nice thing about configurations is that you usually only need to do them once. Given the amount of awesomeness crammed into Ardour, it's totally worth the bother.